Instructions for the Plus version
The Instructions will improve over time. If you have any questions, please don’t hesitate to contact us.
Contents
- Issued Invoices
- How to start issuing invoices using the InvoiceFox software?
- What are the functions of the buttons next to each invoice in the list?
- What is the function of the so-called issued invoices filters?
- What is the meaning of the green P-marked square next to the invoice numbers in the invoice list?
- Estimates
- How to issue an estimate?
- What are the functions of the buttons next to each estimate in the list?
- What is the meaning of estimate filters?
- Received Invoices
- How to record received invoices?
- What is the function of received invoices filters?
- What are the functions of the buttons in the list of received invoices?
- Contacts
- How to add a contact?
- How to enter corrections or other changes to contact data?
- What is the function of contact filters?
- Services
- How to enter services that you will be invoicing?
- Buttons in the Upper Right Corner
- What is the meaning of each of these buttons?
- My Company
- A few pointers regarding your logo.
Issued Invoices
How to start issuing invoices using the InvoiceFox software?
- To start, enter your company’s data by clicking on the My Company button in the upper right corner and filling out the form.
- Now add the contact to whom the invoice will be issued: go to the Contacts tab and click the Add Contact button. (See further instructions in the Contacts chapter.)
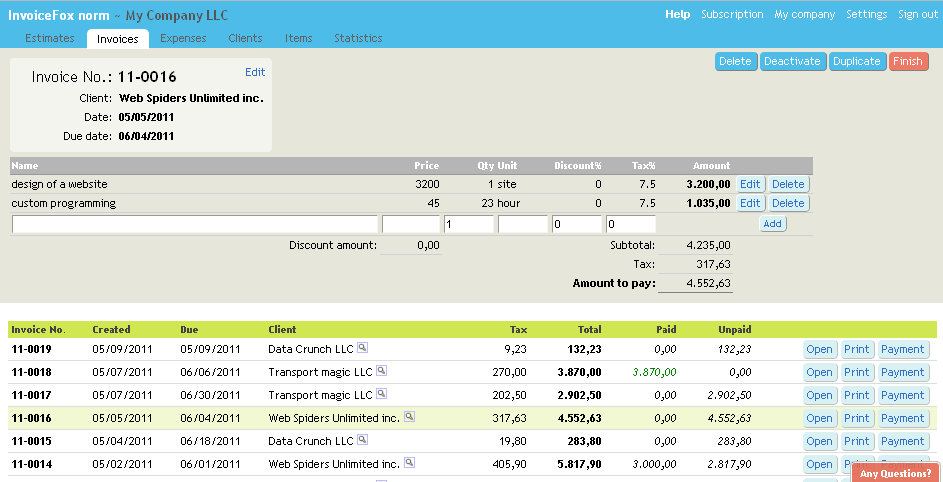
- Then click on Add Invoice and input or edit the data suggested by the software. Click on Continue and proceed to enter other data (name of service, its price, amount, unit of measurement). The invoice is finalized by clicking the Add button, unless more than one service will be listed in the invoice, in which case you should use the same procedure to add other services.
- When the invoice is finalized, click on Close or Export PDF, where you can also print out the invoice. If you wish to print out another invoice using more or less the same data, use the Duplicate Invoice option.
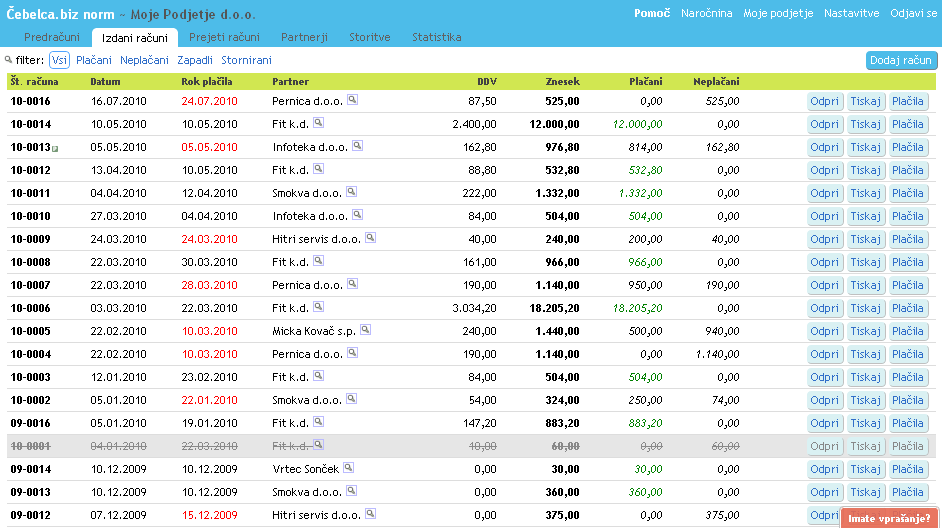
What are the functions of the buttons next to each invoice in the list?
- Click on Edit if you wish to edit the data in the invoice.
- Click on Payments if you wish to record that an invoice has been paid. You will be taken to a short form. You can confirm the payment by clicking the Add button next to the date and amount of payment.
- Delete: you can only delete the last invoice, while previous ones can only be reversed, leaving them in the records.
- Click Reverse if you wish to reverse an invoice; such an invoice, however, will not be deleted, because serial numbers of invoices have to match.
What is the function of the so-called issued invoices filters?
The filters give you a better overview of your invoices by only displaying paid, unpaid, past due, or reversed invoices.
What is the meaning of the green P-marked square next to the invoice numbers in the invoice list?
It means the invoice is based on a pro forma invoice that is listed in the pro forma invoice list.
Pro Forma Invoices
How to issue a pro forma invoice?
- If you haven’t done so already, enter your company’s data by clicking on the My Company button in the upper right corner and filling in the data.
- Add the contact to whom the pro forma invoice will be issued: go to the Contacts tab and click Add Contact.
- Now click Add Pro Forma Invoice and enter or edit the data suggested by the software.
- When the pro forma invoice is finalized, click on Export PDF, so you can print it out, or click Close.
What are the functions of the buttons next to each pro forma invoice in the list?
- Click on Edit if you wish to edit the data in the pro forma invoice.
- Click on PDF if you wish to export the pro forma invoice into the PDF format, where you can also print it out.
- Click on Convert to Invoice if you wish to convert the pro forma invoice into an invoice.
- Delete: you can only delete the last pro forma invoice, while previous ones can only be reversed, leaving them in the records.
- Click on Reverse if you wish to reverse the pro forma invoice; this, however, will not delete the pro forma invoice.
What is the meaning of pro forma invoice filters?
- Active pro forma invoices are those that are still valid.
- Expired pro forma invoices are those whose validity has already expired.
Received Invoices
How to record received invoices?
- If you haven’t done so already, go to the Contacts tab and add the contact that sent you the invoice.
- Now click on Add Invoice and enter or edit the data suggested by the software. You can then record the invoice by clicking Add.
What is the function of received invoices filters?
They help you establish which invoices you have already paid, which ones you hadn’t, and which ones are past due.
What are the functions of the buttons in the list of received invoices?
- Click on Edit if you wish to edit the invoice data.
- Click on Payments if you wish to record an invoice as paid.
- Click on Delete if you wish to delete an invoice.
Contacts
How to add a contact?
If you wish to add a contact, click on Add Contact and enter its data. You have to add the party as a contact before you can invoice them.

How to enter corrections or other changes to contact data?
You can reach the data form by clicking on the Edit button located in the list of contacts.
What is the function of contact filters?
The filters are there to give you a better overview of the list of contacts, as they only display a particular category of contacts.

- Contacts whom you have invoiced before.
- Suppliers from whom you have already received invoices recorded in the list of received invoices.
- Passive contacts that are recorded neither on issued nor received invoices.
Services
How to enter services that you will be invoicing?
You can either enter the service every time you are issuing an invoice, or you can enter it in advance by going to the Services tab and clicking Add Item. This will reduce the time needed to issue an invoice, as the software will suggest services as you type and automatically enter the price and the unit of measurement. You will be able to edit the data when you are actually issuing the invoice. For each service you therefore enter: name of the service, its price and unit of measurement.

Buttons in the Upper Right Corner
What is the meaning of each of these buttons?
Help
Link to the Instructions you are reading right now.
Subscription
Information about your subscription package and your chosen payment interval.
My Company
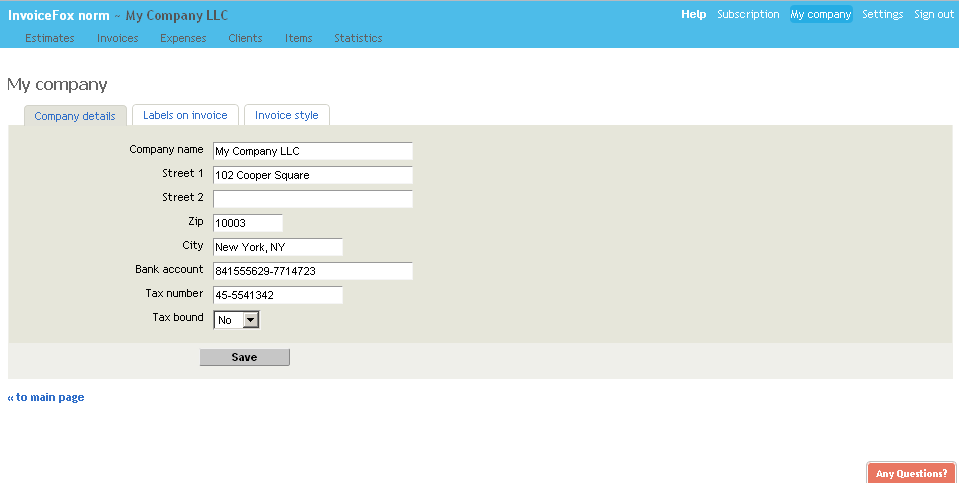
Your company’s data. You have to fill this in before you can start invoicing.
Settings
Your access settings: e-mail, password.
Sign out
Sign out of the software.
My Company
A few pointers regarding your logo
The image should be in the PNG format. You can convert it to PNG from other formats using e.g. the free IrfanView software. The image should not include transparent areas – convert them to white.
Your image can be of any size. E.g. our logo is about 350 pixels wide and about 100 pixels high. However, if the image is too small, it may come across as low-quality in the .pdf; if it is too big, the PDF file will be needlessly big as well.
If you have any further questions, please don’t hesitate to contact us.
If you have any additional questions, please contact us.


© 2004-2013 Refaktor LTD. All Rights Reserved.